Wednesday, January 20, 2016

New Wall Groupings

Hi Friends!  Did you think I disappeared again?  Naw!  I've just been really busy jumping back and forth from project to project around here.  I am sure several of you know how that goes, right?  I am reminded of an old friend who's family used to refer to her as popcorn because you she jumped around from subject to subject constantly and you never knew what was going to pop out of her mouth next.  LOL!  True story and seriously how it's been with me and all that I've been juggling around the house.  In addition to reorganizing cabinets, bookshelves, painting, refinishing, and reorganizing my sewing and craft room,learning to embroider, I've also been taking time to ponder on some of my wall spaces.

  I've been scoping out blogs and google for images on wall groupings. I like a lot of what I've seen in regards to Charles Faudree but in some respects I also tend to lean towards a cleaner less cluttered look..   I feel like a lot of what I've been looking at and reading has been the most helpful in helping me to determine "what" to put on the walls.  So with all of that in mind, I've added a few items here and there.


Let's start in the den...Here's how the wall above the mantle in the Living room looked last summer.


  I had actually decided and already purchased what I wanted to add here a few years ago.  But for some reason I held back.  I think it was because maybe the rest of the room had not evolved enough yet for me to feel comfortable adding what I had in mind for this space. 


Here's what I had in mind for this wall,  it's plates of course!  Not just any old plates either, but beautiful sea blue and green Mediterranean style plates.


I cannot believe I waited so long to add these.  I am so glad I finally did though, what a difference.  They really add just the right amount of color and definition to the space.


Now for the other side of the room, my nautical corner.  This is how it looked last summer.


 And this is how it looks now.  I've always had this picture with the blue matting of the lighthouse on the wall here above the lantern.  I did move it over towards the corner just a bit more.


The main difference now is that I added the photograph of the lighthouse to the wall as well instead of having it here in front of the lantern.  I loved moving that picture on the wall because now it gave me space to bring in another favorite photo of mine of a sailboat from a Charleston artist.

One of the things I like most that I learned about doing wall groupings was to focus on a theme or something of that sort, especially when using pictures. 

Lastly, let's take a look at one more area that got a new wall grouping update.  This is the foyer last Easter. This photo was taken before it got the new paint job shortly after.


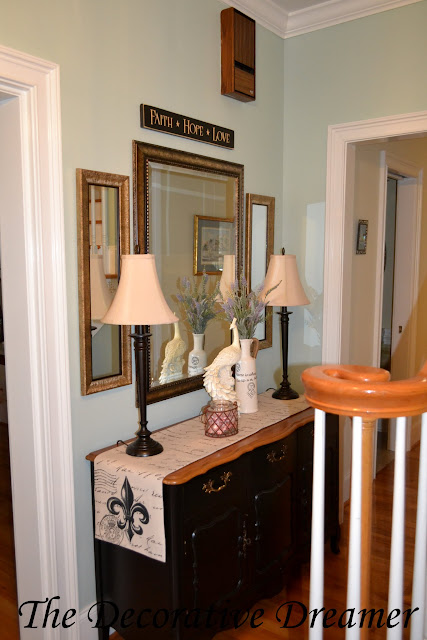
 And here's the foyer now!  Not only did I switch out the lamps yet again, but I added another set of mirrors.

I already had these mirror and they were just sitting upstairs in my craft room unused because I didn't like them where I originally had them.  I had even been frustrated every time I saw them sitting there because I couldn't find the exact spot to use them.  I had been focusing on using them as single accent pieces somewhere.  Not as part of a whole group. 

  I love them as part of this grouping.  I am still tweaking the rest of the foyer décor, but it will get there.  I'm holding out for Valentines décor for this space.


I hope you enjoyed this post and can see how sometimes adding groups of things can totally update the look.  I am well pleased with my choices and am enjoying them without feeling like I cluttered things up too much.  Thank you all for sharing your wall groupings because it really helped me to be able to focus on my choices as well.

Have a great day everyone!
Hugs and Waves,
Mary


Thursday, January 14, 2016

Fantastic Thrifts!

Good Morning friends!  Feeling so happy to be able to share a few of my thrifty finds today with pictures from my camera.  Until today, I have been using the IPhone to download pictures and blog off of my chromebook.  Without getting into all the complicated issues with that, let's just say, what a pain!

I popped into one of my favorite thrift stores a few weekends ago and scored big time! First item up for sharing is this beautiful mahogany colored bookshelf.  It has nary a scratch or nick on it and has beautiful trim with molding.  It was only $5.00 too, what a deal right?  Wellllll, it's missing it's shelves with the exception of the built in one in the middle.  Strangely enough it still has several pins in place for where the adjustable shelves were.  I was still thrilled because I just happened to be in Lowes the other day and saw they had laminated shelves in this color.  I knew the price on those and when I added in the cost of the bookshelves I was still thrilled. Should be an easy fix, if not we'll just have to buy some wood and stain them.


 I don't know about you but bookshelves are a premium in my house.  I've been scarfing them all up for my craft/sewing room.  I was thrilled to find this one to put in our upstairs foyer between the bedrooms.  I already had a white one in this same exact spot until I took it for the craft room.  The dark colored wood fits the rest of the pieces in this small space so much better.  Please excuse the mess on the sofa, this room is still a work in progress.  It's such a tight space and I've wrestled with how to make it useful for so many years. Now, I finally have a plan.  It's going to be a reading, game and TV nook for family and guests.  We are planning to add a flat screen here where the mirror is above the small built in below.  That space was originally intended for a TV when the house was built and is cable ready so wiring this wall is going to be a snap.  We just have to recoup from Christmas and then we can look for the right sized TV, so that's the plan anyway!  Love when a plan comes together, don't you?


 Okey dokey, next up is a little something I have wanted forever!  It's one of those things I've never wanted to buy because it's like something I knew the Mr. could make.  Butttttt, it's one of those things that's never been high on my priority list to beg him to make.  I said beg, because it looks like it might be kinda annoying to make. Maybe not so annoying for some of you handy dandys, but the Mr. stress's over stuff like this. All those holes would have driven him cray cray.  LOL!  So without dragging this out and teasing ya anymore, anyone know what this is?


That's right!  It's a casserole carrier.  It's what helps keep the casserole dish from sliding all over the back trunk of the car when your off to Grandmas house or wherever you need to take a dish.  It still needs some pegs but cutting a dowel is low stress compared to drilling all those holes in precision. Don't you think?  I am going to change out the handles to some fancier ones I already have and repaint it.  I promise I will reshare when that little project is finished.  We got this!

Lastly, this little find was quite the treasure and quite the deal!  In fact it was such a good deal, I'm not even going to give you the exact number but I will say it was a single digit amount.  I don't want to say how low it was outloud because well, they are still quite in demand.


Do you know what this is?  Right again!  It's a Pampered Chef deep covered Baker.  I just love their stoneware and have a few other stoneware pieces but not this one.  I have wanted one of these for awhile now.  But once again, I'm a thrifty kind of a gal and not real big on cooking so again it's not one of those items I really wanted to spend money on.    Just as the bookshelves, this bargain find does not have one scratch or nix on it. In fact its what I would call pristine condition.   Judging from how beautifully it cleaned up it almost looks like it was never used.  It was actually dirtier on the outside then on the inside when I got it.  I was so excited I even called my local Pampered Chef rep about the proper way to thoroughly deep clean it.  I didn't want to mess it up but wanted to make sure it's been cleaned very well because I'm funny about stuff like that.  She said I only needed to use baking soda and then to cook a whole chicken for it's first seasoning.  Still haven't made the chicken yet, but hey, I got the bakeware!

Since I'm starting to get back into blogging a little more, I am going to share this post at a few parties today. I thought it would also be a great way to let some of you know I'm back to blogging some again.  It would be so nice to hear from a few of my old blog friends if your still around.  You can follow the links below to see more posts and pretties at;


Hope you all are off to a great day, and a great weekend too! 
Hugs and Waves!
Mary