Pages

Tuesday, February 23, 2016

Open Shelves in the Kitchen

Good Morning!  What a lovely day!  Just kidding!  More like rain, rain go away, come on back another day. Oh well, what can you do?

Well, you could come on in, it's nice and dry inside and cozy comfortable too.   I promised I would be back to share a few of our latest projects.  Today we will take a peek in the kitchen.   I am linking this post up with;
and

 I have been checking out lots of pictures on the internet of open shelves after deciding that is what I wanted in my kitchen.  There are so many gorgeous displays out there!  I don't know if she'll see this post or not with all the other hundreds of links but Suzy's (seen here at Worthing Court Blog) kitchen shelves were a big part of the inspiration for my shelves.  Thank you so much for the inspiration to go with a stained wood finish.

This wall where my shelves are used to be home for my bakers rack.  It now resides on the screened porch.  I decided I wanted to move the rack and add shelves after I moved this table in the kitchen.  This used to be my dining room table.  After I got a new formal dining room table last year I moved this table to the kitchen and the large round table to the den.  I still have a beautiful refinished smaller round table that is now upstairs in one of my sons old rooms.  I can't stand to think of parting with it yet after having done all the refinishing on it.  I have a table on the screened porch and two outside around the pool.  I seriously have a table overload problem!  Anyway, let's get back to the shelves.

After searching around for weeks for just the right size and style of shelves for this wall I finally decided to go with a stained wood look.  I like the warmth of the look especially in my all white kitchen.  

My first choice came with the purchase of these wrought iron brackets from Hobby Lobby.  They posed quite the challenge trying to determine which way I wanted them mounted as they could be mounted with a longer undermount or a shorter undermount if you flipped them around.  As you can see I liked the longer undermount.  It was also a job picking out the wood because I wanted a more rustic look but the Mr. wanted sturdy.  So we settled in between and went with unfinished maple.


  After my husband cut the sizes I wanted I stained the shelves myself using Minwax, in English Chestnut.  Sounds perfectly European doesn't it?

Staining the shelves was the easy part, hanging them was a bit of an ordeal.  You see there is a light switch on this wall near the doors.  I know, what a terrible place for the switch but there it is.  We agonized for several hours on where to put the brackets on the wall in relation to where they would be mounted on the shelf and how centered the shelves were on the wall.  Sounds easy in theory but in reality it was anything but.

Finally after way to many debates and discussions, they were mounted.  Yay!!!

I love my shelves!  I am still not 100% sold on this table in here.  I would love something with more storage but it will also have to be up on legs so as not to block the vent on the floor below.


 I know many of you may be thinking I should just paint the table a nice shade of grey or blue or white or something like that.  But honestly y'all, I love this table as it is, I'm just not sure I want to keep it in the kitchen here. I also think I would regret it instantly if I repainted it.  It's just a cheap old table I picked up from Ross one day some time ago but I still love it.  I  love the primitive and rustic uneven paint job on the legs and side.  I especially love the fruit basket on the top, though at times it does make for a very busy vignette and requires a table topper.


 Today no topper required though.  I am so happy to have another fun place to share some decor in the kitchen.  I thought you might like to see a few close ups of my shelves as I have them set today.


I set the table up to serve as a buffet style arrangement.

The first shelf I decided to use to bring in a little more pop of green for St. Patty's day.


It's going to be so fun changing out a few things on here for Easter.  I'm thinking just a few small changes though.

This was another small project.  I have several of these small faux herb pots I got years ago from Michaels.  I finally did a burlap update to them.  Easy peasy and so cute!

Of course I had to keep one of my roosters up on the top shelf.  Cock a doodle do!

I'm still in love with my rustic old clock purchased from Hobby Lobby one year.  I still haven't even bothered to put a battery in yet either.  LOL!  Some things never change.

So what'cha think?  I hope you like.  I know I do.  Yes, it's lots of pics here today but I hope you have enjoyed the peek.  I have a few more small adjustments I've made around the kitchen that I will share another day.  

What I like the most is that I think it's kinda got that farm house look (that's so popular right now) but also a bit more on the Frenchy side which is what I'm really trying to aim for here.  Again, I keep imagining a more French Meditterean style in my head if there is such a thing.  Somebody please tell me there is such a thing!


I've been rethinking the way I want to use my kitchen a lot lately.  The changes I've been making are more about how I want to live and how I want things to function not just because I've seen another person doing it.  Trust me,there will be no barn doors in my kitchen.  LOL! 

   Let me be clear though.  All kidding aside, seeing what others are doing is so very helpful.
 THANK YOU!!!
 It helps spur the imagination and also helps fuel the determination.  I am so grateful for you who share.  It's part of why I keep sharing too. 

I cheated and used Picasa today, still struggling with getting photos out easily on the blog without.  I hope to get another post done soon so come on back if you like.  Still could use any advise on what photo uploader to use now as well. (see previous post)

Thanks so much for stopping by today dreamer friends!
Hugs and Wave,


Thursday, February 18, 2016

Valentines Dinner at Home

This year Valentines day was quite enjoyable.  To be honest, they all have been pretty nice.   I don't think we've ever done any big celebrating but we have spent some years going out to dinner and/or exchanging gifts.  We opted not to do gifts this year after recently just purchasing a new desktop computer for me and because we are spending lots of money getting a new bottom job for the boat.


Since Valentines day fell on Sunday we leisurely enjoyed all afternoon together and spent the day getting some things done around the house.  I am very excited about that and hope to share a few small finished projects with you all soon.  My valentine is a good man and knows how to treat me right.  I am a happy wife when he tackles that honey do list.  We wrapped up the evening with a delicious steak dinner cooked at home on the grill.  Of course, you know me, I just had to jazz up our meal with a few sweets and a few decorations for our sweet little table for two.   


Everything I used for our setting I already had on hand.  The only things new this year are the plaque I made a few weeks back and the metal X and O, both were purchased and made for other displays. 

 It all started with my decision to use my off white table cloth because I don't have a solid white. I actually liked the softness of the off white and surprisingly enough it complimented all of my other elements quite well.


I also decided I wanted to keep the lazy susan on the table since its such a large table. Additionally, this would give my display in the middle a bit more depth.  I was pretty thrilled to find the off white round crochet table topper in my linen drawers.  I have a pair I used on round tables by the bed waaaay back in the day. Sometimes it's good to hang on to old linens.


After getting the linens in place it was an easy pull together on the center display just pulling a few pieces here and there from a few of the Valentines displays I did around the house this year.


The flower arrangement from the kitchen was light and a perfect off white match to the tablecloth.

I then placed the Love plaque I made this year (see here) on the table, the mercury candles jars, a little faux lighting and topped it all off with the adorable metal X and O I purchased this year from Michaels.


I just adored my place settings. Sorry, I don't mean to gush but they were just soooo cute!!!


Here's the breakdown, I started with my Lenox Butlers Pantry dishs, then added the linen dish towels I purchased a few years back from Stein Mart when I managed the home dept.  I have a set of six of these because they went on clearance after not selling during for Valentines one year.  I think they were perfect for Napkins, don't you?


 The red heart plates are melamine and have a bit of a sparkle to them.  As you can see below, they were just perfect for dessert.


I brought out the bubble acrylic goblets also from Stein Mart and these beautiful blown glass stems given to me from my son for Christmas a few years back.  

Need I say more!  It was an easy day followed by an easy dinner for two with a festive atmosphere too.  Life at home is good!


Thank you so much for popping in today.  If you enjoyed seeing this tablesetting and you'd like to see more there is a party going on over for;
Go on check it out, it's beautiful!

On a side note;  Did you know Picasa is going away?

I'm not trying to be whiner but let me share how much of a struggle it was to get my post out on time today. It was a big struggle because I just found out last weekend that Picasa is going away.  I know it is not until March that they stop supporting it and I still could have used it but I really felt the need to figure out a new plan immediately.   I have used them for years to do my editing and storage of photos.  I was quite in a panic until I read and have assured that all my photos are backed up on google photos.

I felt relieved that they have an editing program but  I was again disappointed to find out that the editing features were not all I had hoped for.  I don't know if I was doing something wrong but I couldn't for the life of me figure out how to watermark my photos on google photos.  I have no text symbols at all, so I had to back track and re-decide what to do. It was all very challenging because I am also on a new computer that uses Windows 10.  I like the system but I was having problems with it trying to figure out the path my photos were taking when I downloaded them.  I could find them on the Windows gallery but not in the computer files and that was a problem when trying to edit them in another program.  Finally, I figured out how to redirect the Windows photos to a folder I could find.  Whew!  

For the moment I have decided to edit my photos using Ribbet.  I like how quick and easy it is and I can save edited photos really fast right back on my computer.  I don't like not being able to easily work on editing batches at a time and uploading batches at a time to blogger.  Since blogger is so supportive of Picasa I've become quite spoiled.  I wonder how this is all going to play out soon and what will be the new replacement.  I know it's all good, but sometimes these changes....

With all that being said, I hope to be back with another post soon (after I recoup some time) my sweet readers to share my latest home project.  I hope you'll join me again.  Hope you all are having a wonderful and productive week as well.  
Hugs and Waves!

Friday, February 12, 2016

Sharing some Love with Lavender

Hi Friends!  Since it's almost Valentines day I thought I'd share a little LOVE with you today and tell you about a few of my favorite Lavender things.   Do you like lavender?  Of course you do and I sure do too!   I love almost anything to do with Lavender.  I absolutely love everything about it!  I love the color, the aroma, the oil, the plant, the blooms, the seeds, and the texture to name just a few.   All of those previously mentioned qualities contribute to the whole calming and relaxing enjoyment I get from lavender.  Just the word alone sets my spirit right.

Somehow at some point in time I also began to associate Valentines with lavender. Maybe because when I was young I remember seeing Valentines cards with lavender on them.  Here's one I found today that is so cute!

source: Stylepinner.com

Besides being in love with the color, I really love, love, love the plant itself.  Growing Lavender here in the SC red clay that I have at my house is challenging to say the least.

 Some how I have managed to get one lone plant to survive and thrive.  This plant and another one I had in some pots on the deck for a few years before I put them in the ground.  This one loved the transfer and has thrived very well doubling in it's size.  The other one not so much.  I have tried two more additional plantings with no luck again.   I'm not giving up yet though, I'll just have to keep amending the soil until I get it right.

 I love the way Lavender looks and feels.  I especially love that you can smell the Lavender on your hands after you touch it and run your fingers though the leaves of the plant.  I have Rosemary that is the same way and smells so good on your hands.

I'm sorry I don't have any blooms to share with you today but its not quite the right season for that yet.  I can tell you if this beauty blooms like it did last year it will be stunning.    I promise to come back and share this plants beautiful purple flowers when it  does bloom.

Now if you really want to fall in love with lavender, and surely you must, because your here reading this and because I really want you too, okay?  OK!  You absolutely must try what I wanted to share most with you today.  Here's my secret for indulging in lavender.


You absolutely positively must try these lavender bath salts.  These are by far the best ever hands down!   I received these as a gift one year from my son and his girlfriend and I have been spoiled ever since.  In fact there is only one store nearby that carries it and I have to drive a little further to get this.  This brand is the only one I buy!  Aura Cacia has the best lavender aroma ever combined in a mineral salt that will sooth your spirit as well as your muscles. I've shared this brand on my blog once before in a previous post about my bathroom retreat here.   I love that it is not a bubble bath and I can turn on my jacuzzi tub without worry about bubbles overflowing everywhere.  It truly is a whirlpool of aromatherapy and a spa like indulgence right at home. 

This year I added a little something to my lavender indulgence.  I must have spent a whole afternoon searching for just the right scent of lavender soap to add to a Christmas present for my groomer.  She of course got the bath salt and some hand lotion but I also wanted her to have some soap.  I did find several wonderful homemade and organic type soaps but they were quite expensive and usually sold by the single bar only.  I kept searching and when I was at TJ Maxx I hit the mother-load of Lavender soaps.   I'm not kidding when I say I literally sat down on the floor and smelled almost every brand there was until I found what smelled like authentic lavender to me. I even had another customer who also sat down and started smelling soaps with me.  Too funny! I knew I found what I was looking for when I came across these in a beautiful box of 6.  The brand is Fiorentino, and is made in Italy. What I liked about these other then the smell was that you get more then one bar and they are just the right size.  Not too big and not too small.   I love that I can use these in the guest bath for company or in my master bath without some great big honking bar of soap that sits there forever and looses it's smell.  It feels very clean and much like a milled soap to me.  I love the cute little embossed fleur-de-lis on it.  It's so enjoyable when I go into our half bath to wash my hands that I feel like I've just given myself a little treat.  Try it, it's that good!


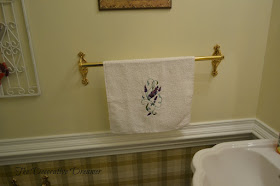
This morning I added more lovely lavender to the half bath with a newly embroidered hand towel.  I found this cute design online at Emblibrary and knew instantly where I would use it.  This is the last of the inexpensive hand towels I picked up to practice on from Walmart.  I think this turned out beautifully!  I do believe I am now ready to search for a few nice quality hand towels to embroider on.  I may have to make another one and do a set for in here though.  Now that I look at the picture, it looks a little lonely on that bar by itself, don't you think?

Well if I haven't convinced you yet of all the virtues of indulging in authentic lavender I've got one more small pleasure you could try.  Maybe you don't think you have a green thumb or are like me in an area where lavender is a real challenge to grow.  No problem, you could go faux!  


Last year I shared a post about this pretty little faux Lavender plant that I purchased at Michaels.  I shared it with you when I was showing what was the very beginning of my foyer makeover in a post titled Frenchy Foyer (click here to see).  These had just the right gathered look of fresh lavender.   I also picked up a few more different faux styles to scatter around the house.  I would love to find some dried Lavender that is not too expensive and made well to stay in tact. I have sometimes seen that the dried Lavender blooms tend to fall off easily if not handled carefully.  If you are good at being careful (which obviously I'm not) you may want to search for a dried version of lavender in a wreath or pretty bouquet.  I promise you won't regret it. There is something so enchanting and so old worldly about looking at lavender you can't help but fall under it's spell.

Thank you so much for popping by today and I hope you all are having a very cozy and relaxing weekend.  I would love to hear about your love for lavender or anything about it you'd like to share.    Wishing you all a very happy Valentines day!

Hugs and Waves!

Wednesday, February 10, 2016

Mardi Gras or Fat Tuesday

Which do you prefer?  We claimed both at our home!  This year was just a little bit different at our house.   I decided to step up our celebrations a bit and attempt to cook an actual New Orleans style meal to enjoy with my tablescape. My dinner menu of choice was Jambalaya and California Dreaming King Cake. It may not sound like much for a celebration but for the two of us it was just enough.  We definitely were feeling like it was Fat Tuesday.

Our large round family table is in the den now and is where we enjoy most of our meals these days.  I decided this would be the perfect spot to set up my Mardi Gras tablescape.

This year I stayed focused on using dishes I knew we would use with the exception of a few filler plates.  It's okay to have some just for show, especially for Mardi Gras.   I wanted to try and stay close to the traditional Mardi Gras colors, though I ended up with quite a variation in the shades. I didn't have many choices in green, gold, and purple dishware.  I also didn't want to use anything I have used in my two previous Mardi Gras tablescapes.  I will reshare those again at the end of this post, or you can revisit those posts here, 2014 and here 2012.

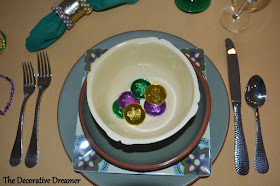
  My charger plate (well that's what I'm calling it) is really a terracotta dinner plate that was set just for show.  I chose this to give the whole place setting a bit more depth and width.  I used the green in keeping with Mardi Gras colors and because it complimented the salad bowls I knew we would use for dinner.   Note to self: You really need some gold chargers!

 My next choice for the stack was these square melamine salad plates.  These were to be our dessert plates for later.  They  were also chosen to bring in purple, another one of the traditional colors of Mardi Gras.  I have some lovely small round deep purple salad plates I really wanted to use but they just didn't fit with the rest of the stack.  Maybe I will share them in another tablescape soon!

 This was the dish that was so important for me to keep and the very one I worked everything around. It is a terracotta salad dish that closely resembles a bowl.  I love this dish!  It is perfect for meals like the one we had tonight when you need something in between a bowl and plate.


Finally I topped the stack of dinnerware off with a yellow bowl.  This was to catch all the shrimp tails that we had to peel off ourselves.  I used frozen shrimp for this dish and I while I saw that is was indeed peeled and deveined (time saver) the tails were still on.

Of course I had to throw in a little Mardi Gras bling to spice up the setting.


 Sparkly and bubbly silver stainless flatware and a gold rimmed wine glass brought in a few more festive touches of silver and gold.

 The most exciting elements used for this table for me were the napkins that I embroidered myself just for the occassion.  I decided they looked so cute they even deserved a combination of three napkin rings for a big bling factor.

 This design was such a cute design I found online that I knew I had to try it.  I did some slight editing as it was supposed to have the word Royalty underneath Mardi Gras.  I didn't want that, nor did I want to use the colors that were recommended which brought in Royal blue and Red.  If there are any native New Orleans families out there peeking in, I do apologize for changing up the traditional royalty colors.  I really wanted to keep this design a little more simple yet still have a bit of  bling with the crowns.


For my centerpiece I used some faux flowers I already had.  I just pulled together all the different colors I needed and it was done.  I only added a few beads, again trying to keep it more simple.  I know it's quite odd to keep things more simple for Mardi Gras but that's the way I was rolling this year. 

I didn't want to go out and purchase anything for this setting.  I already had all of these on elements on hand and I really wanted to just focus on the dinner this year.

...And focus on it I did!

Let me tell you the Jambalaya I made was soooo good!!!!  It had all the right ingredients in it to make it one of my newest favorite dishes.  I used a recipe I found here at Gimme Some Oven, with just a few slight adjustments.  I am all about saving time so when I found a frozen package of celery, bell peppers, and onions I was very happy.  I also grabbed a bag of frozen Tyson chicken chunks.  I know it's processed and maybe not the best choice but I really, really, hate to cut up chicken.  It's strange but it just bothers me.  I like to cook fresh chicken, love it, just hate to "cut" fresh chicken.  I also used frozen shrimp because the local shrimp around here is just not the best this time of year.  Remember I was going for quick and easy.  I did use almost all the other suggested ingredients and let me just say it was the bomb!

 Speaking of bombs!  This was supposed to have been the California Dreaming King Cake.   Go ahead, you can laugh out loud now.  I did.   Unfortunately, I didn't grease my bundt pan well enough and it stuck and stuck and stuck.  I tried very carefully to get it out but it would not budge.  Then I finally just gave up, dug it out and preceded to dump it all in a bowl.  It was pretty good even though it looks absolutely awful!  Hey, I know, why in the world would I show you this?  Well, I'm all about keeping it real here.  You win some, you loose some!

I took this picture with such high hopes, thinking I would have a lovely cake to show you too.   You can find the recipe I used for the cake here at The Painted Apron.  This recipe called for olive oil and wine so I just had to give it a try.  I wanted to try this cake since I had some Chardonnay on hand given to me from a friend.   I'm not really a Chardonnay kinda gal.  I like White Zin so this was to be perfect time to open it and use it.  No, I didn't drown my sorrows in it later either, though the thought did cross my mind.


Thank you so much for stepping into my home today for a visit and a chat.  I hope you enjoyed this post and I hope you'll come back again sometime.

Mardi Gras 2014

Mardi Gras 2012


  Tablescapes are just one more of the many things I enjoy sharing with all of you and I also plan to share this post with a few others at;

This is an action packed week for us.  We've got a 2 year old birthday coming up for this little one,
 and then a Valentines weekend too.  Whew, Good Times! 


Hope you had a wonderful Mardi Gras,
Hugs and Waves!